
This lesson can be done with live spiders; spiders ordered from a scientific supply store; or with preserved specimens, photographs, or microscope slides. Crickets are best obtained from scientific supply stores or pet stores that sell reptiles. You'll have better luck with the activity in warmer weather, since by winter most spiders have either died or gone into hibernation.
Objectives:
- name and describe the distinguishing features of each group of arthropods, especially spiders and insects
- describe some of the places where spiders live
Materials:
- preserved specimens/slides, or illustrations of spiders and crickets
- petri dishes
- glass tubes
- water-proof marker
- forceps
OR
- live spiders and crickets
- insect net
- jars
- old hosiery
- rubber bands
- sticks
- cotton balls soaked in water
- magnifying glass or a microscope
- paper and drawing materials
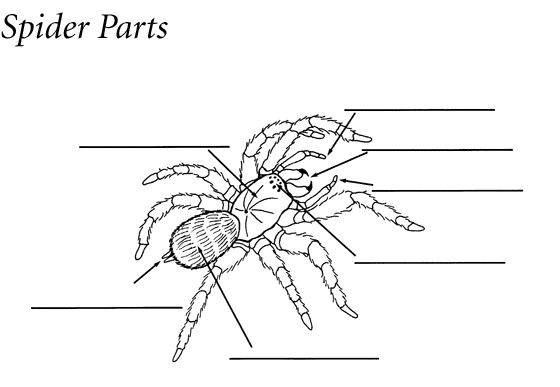
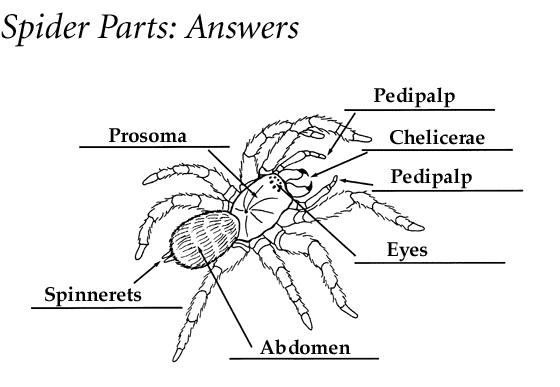
- copies of Spider Parts worksheet and Answers
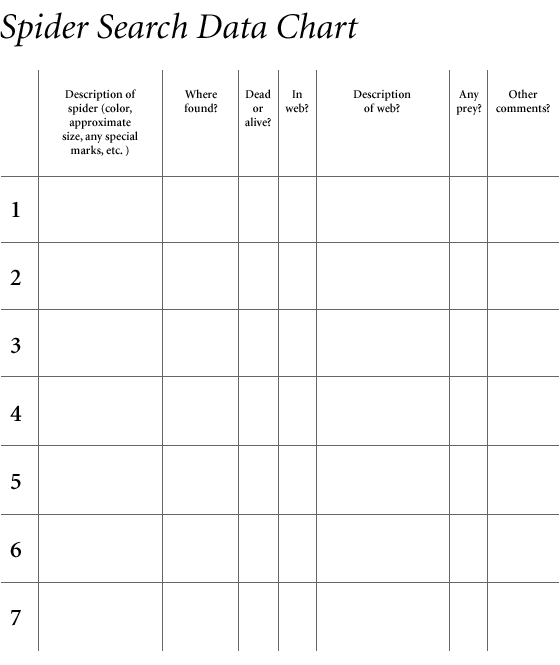
- copies of Spider Search Data chart
Subjects:
science
Part A – Spider Parts
Preparation:
Using preserved specimens or slides:
Care of preserved specimens: Preserved specimens can be purchased from scientific supply companies such as Carolina Biological Supply. These are usually preserved in rubbing alcohol which makes the specimens brittle. Purchased specimens should be transferred into glass tubes containing a solution of 70% ethanol. For identification labels, write the name of the specimen on a small piece of paper in water-proof ink and add the paper to the specimen bottle. Always return specimens and labels to the correct container. Only teachers should handle and present the preserved spiders.
Use petri dishes to present preserved spiders. Fill the bottom of the petri dishes with 70% alcohol and place the spider in it. Handle the specimens gently using forceps. The specimen should be completely submerged. Otherwise, there will be too many reflections to see details properly.
Gently arrange the spider's legs stretched out. Study the preserved specimens either with magnifying lenses or position them under dissecting microscopes. Make sure the specimen is well illuminated. Select the required magnification and focus the microscope prior to classroom use. The specimens can be set up early in the petri dish if the dish is kept covered with its lid. Remove the lid only when it is time to view the specimen. This prevents fumes and the formation of vapor. Return the specimens to their own containers as soon as you are finished with them.
Safety note: The spider specimens are preserved in ethyl alcohol (ethanol), which also contains small amounts of methanol and ipso-propyl alcohol. The fluid is flammable and toxic when swallowed. Keep the spider specimens and alcohol away from sparks, heat, or open flame, and use with adequate ventilation. Store in tightly closed containers and keep out of the reach of children. Students need to be supervised at all times while preserved specimens are in the classroom.
Care of microscope slides: Microscope slides with spider specimens can also be purchased from scientific supply companies such as Carolina Biologics. These slides are meant to be used under a dissecting scope or with a magnifying lens. Compound microscopes are not suitable for these slides. Touch the glass slides only at the rim. Avoid dust, fluids, and scratches. Teachers should consider setting the slides in place under the microscope to avoid rough treatment that may crack the slide. Polish the slides gently with a soft, lint-free cloth or lens paper.
Using live spiders:
If possible catch several spiders – one for each group of three or four students – before starting this activity. One way to find spiders is to simply sweep through vegetation with an insect net. (Don't try to handle the spiders directly. Most spiders don't move very quickly, so once a spider is in the net you should be able to gently "persuade" it into a jar.) Put each spider in its own jar and cover the top of the jars with a piece of old hosiery, held firmly in place with a rubber band. Also put a couple of small sticks inside each jar (some spiders will spin a small web between them). Jot down where you found each spider so you can return it to its natural habitat later.
Try not to keep the spiders for longer than a day. If you need to keep them longer, add a moist cotton ball to each jar so they can drink.
Note: Keep in mind that most spiders, while not poisonous to humans, are capable of biting. It's fairly easy to avoid being bitten if you avoid directly handling the spider. Under no circumstances should you attempt to capture either a black widow, brown recluse, or other poisonous spider. If you're unsure about what these spiders look like, look at their pictures in a field guide or other book before capturing your spiders. Also remind the students to keep the covers securely on the jars.
Procedure:
1. Using the information in the teacher background section, introduce the students to the basic characteristics of spiders. As much as possible, use the specimens or photos of spiders to point out the two main body parts, eight eyes, fangs, and other parts listed on the Spider Parts worksheet.
2. Hand out copies of worksheet and have the students fill in the blanks. Go over their Answers.
3. Assign the students into small groups and give each group one of the live spiders you caught earlier. If possible, have the students use magnifying glasses to try and find the spiders' two main body parts, chelicerae (jaws), spinnerets, pedipalps, and all eight eyes. Also ask the groups if they can find the identifying feature of arthropods (the "joints" in the legs).
4. If you collected the spiders on the school grounds, have the students help you return them to where you found them.
Part B – Spider Search
Procedure:
1. Assign the students into small groups and explain that each group will be searching for spiders. With the students' help, make a list on the chalkboard of places to look for spiders. Remind the students that spiders often hang out in corners, crevices, and other hidden places.
2. Hand out copies of the Spider Search Data chart and review any information that may be unfamiliar. For example, for the "web description" column, explain that different kinds of spiders spin different kinds of webs. (For that matter, some spiders don't spin webs at all – see In Pursuit of Prey.) Some spiders, called orb weavers, build orb webs (the "typical" spider web). Others build funnel webs, sheet webs, cobwebs, and so on.
Tell students that they should describe any webs they find in the "web description" column. If it's an orb web they should say so. If it's any other kind of web they can describe its appearance briefly. (They don't have to determine exactly what kind of web it is.) If a spider is in the web, they should describe where it is and what it's doing.
3. Take the groups outside and give them 30 minutes or so to search for spiders and fill out their data sheets. You might want to consider having an adult accompany each group. (Caution: Be sure to warn the kids in advance to avoid touching the spiders. Also caution the kids to be careful when turning over rocks or logs. They should never put their hands underneath these objects. And for the sake of the creatures for whom the rocks or logs are home, they should always turn the objects back over when they're finished.)
4. After the search, discuss the students' data. You can have them to create graphs portraying, for example, the locations with the highest concentrations of spiders, the numbers of web versus non-web spiders, and so on.
"Spy on a Spider" is adapted from activities developed by Caroline Maier and Dr. Petra Sierwald for the Delaware Museum of Natural History.
|
|
|
